
With more and more people take electronic cigarettes as an alternative to traditional smoking, vaping products like disposable vapes, pod systems, big mod kits, and e-liquid flood the smoke shops or gas stations. However, chances are you still cannot find a pod or bottle of e-juice that meets your palate or cravings. Thus, think creatively; making vape juice by yourself is the best solution.

Considering that DIY vape juice can be a skillful and safety-related thing, here is a considerate guide for beginners, including the preparation and mixing process and practical tips.
Quick Look:
Understanding the Basics
What is Vape Juice?
Vape juice, also known as e-liquid or e-juice, is the lifeblood of vaping. Vapor that you inhale is generated by vaporizing this e-liquid. It typically contains the four key components:
Propylene Glycol (PG): A thin, odorless liquid that produces a throat hit similar to that of smoking tobacco. It carries flavors well and is commonly used in food, cosmetics, and pharmaceuticals.
Vegetable Glycerin (VG): A thicker, sweeter liquid that creates more vapor and a smoother throat hit. VG is also used in food and personal care products.
Flavorings: Vape juices are available in a wide range of flavors, from traditional tobacco and mint to fruits, desserts, and more exotic blends. These flavorings are usually food-grade and safe for consumption.
Nicotine (optional): Many vape juices contain nicotine, the addictive substance found in tobacco. Nicotine levels can vary, allowing users to choose the strength that meets their needs or to use nicotine-free options.
Benefits of Making Your Own Vape Juice
Customization: You have complete control over flavor, nicotine strength, and VG/PG ratios, tailoring your vape experience to your liking.
Cost-effectiveness: DIY vape juice is cheaper in the long run than commercial e-liquids.
Quality Control: You know exactly what goes into your vape juice, ensuring the use of high-quality ingredients.
Exploration: Experiment with a wide array of flavors, discovering combinations you love.
Ingredients and Tools Required
Essential Ingredients
Base Liquids: The first thing you need to prepare is vape juice's foundation, consisting of Propylene Glycol (PG) and Vegetable Glycerin (VG). PG provides a stronger throat hit and carries flavor more effectively, while VG is responsible for producing thicker vapor clouds. Different PG/VG ratios may lead to different vaping experiences. Common options include 50/50 (balanced PG/VG), high VG (more Vegetable Glycerin, smoother and thicker vapor), or high PG (more Propylene Glycol, stronger throat hit and better flavor carrying).
Flavor Concentrates: These are key to your vape juice's taste. A vast selection of flavor concentrates is available from numerous suppliers, ranging from fruity and sweet to savory and complex. The general recommendation for diluting flavor concentrates in your vape juice mixture is between 5% and 10%. However, some might go up to 20%, which is often considered the upper limit by many DIY enthusiasts. This percentage can vary based on personal taste and the specific flavor concentrate used.
Nicotine: Available in different strengths, Nicotine is a chemical compound typically derived from tobacco leaves or made synthetically. It can satisfy your cravings, especially for novice vapers. In DIY e-juice making, nicotine is often added in the form of a 'nicotine shot' or 'nicotine additive.' This allows you to customize the nicotine strength of your juice.
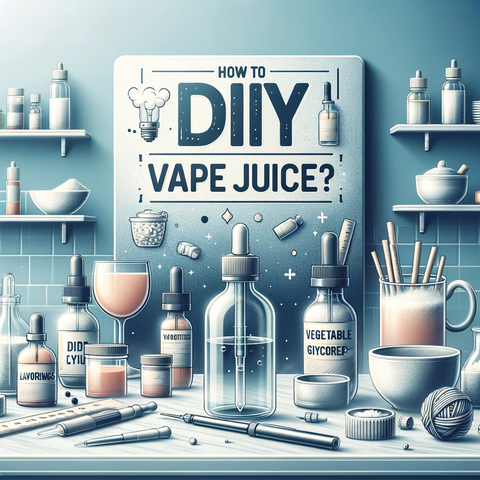
Equipment Needed
Mixing Bottles: Use clean, airtight bottles for mixing and storing your vape juice. Having a variety of sizes, such as 30ml, 60ml, and 120ml, allows for flexibility in batch size.
Pipettes or Syringes: Pipettes allow for the exact measurement of liquid ingredients, such as adding minute drops of concentrated flavor to larger volumes of base liquids. Syringes are marked with clear measurements, ensuring accurate ingredient volumes. Syringes come in a range of sizes, from small 1mL syringes ideal for precise flavoring to larger 10mL or 20mL syringes for bulkier liquid transfers.
Gloves and Safety Gear: Essential for safety, especially when handling nicotine.
Labels: These are noteworthy for tracking your creations, including details like flavor, nicotine level, and creation date.
6 Steps for DIY Vape Juice
Step 1. Choosing a Recipe and Ratio
For example:
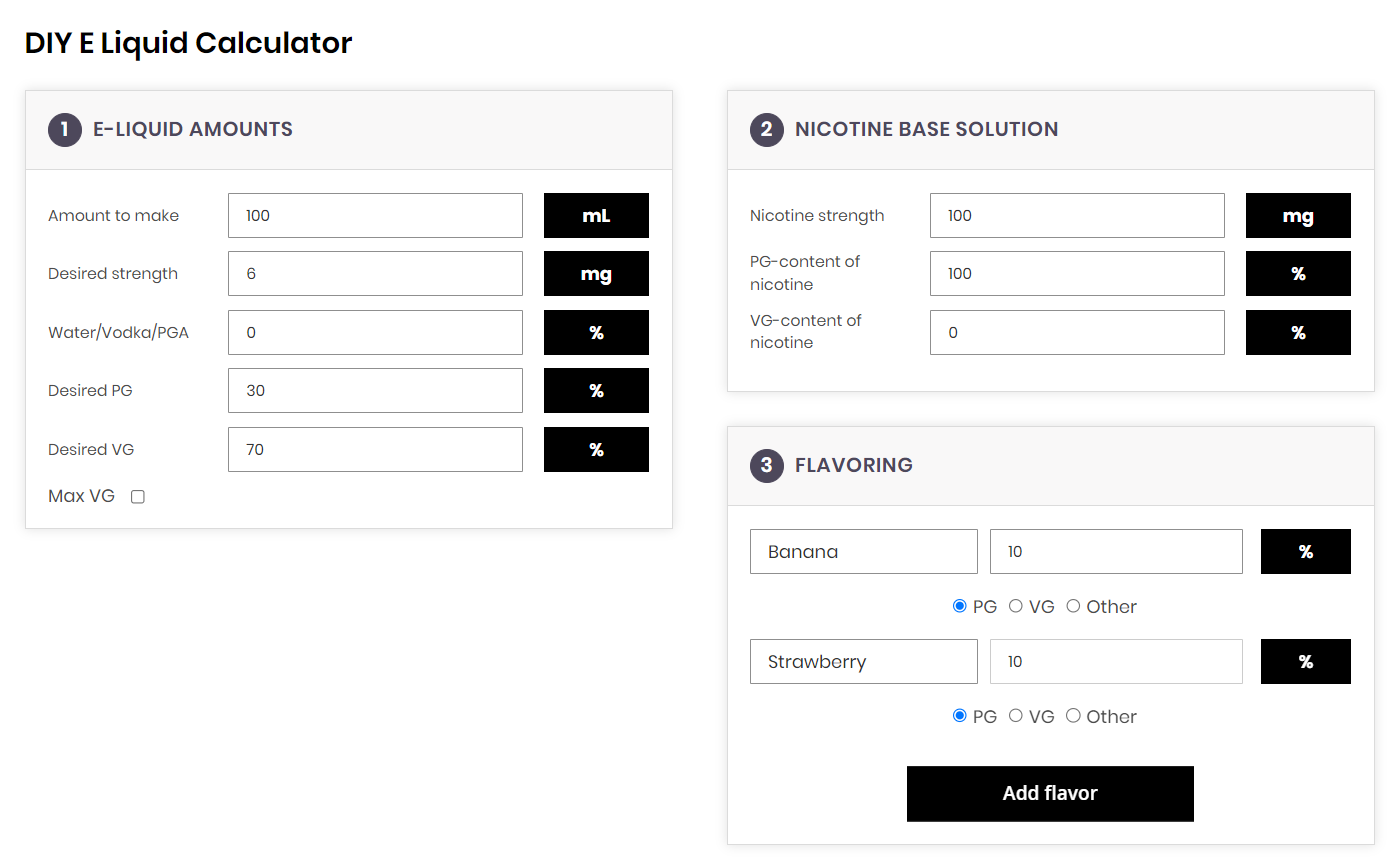
Recipe: 100ml e-juice, 6mg nicotine strength.
Ratio: 70% VG (Vegetable Glycerin), 30% PG (Propylene Glycol).
Flavors: Banana (10%) and Strawberry (10%).
Step 2. Calculating Ingredients
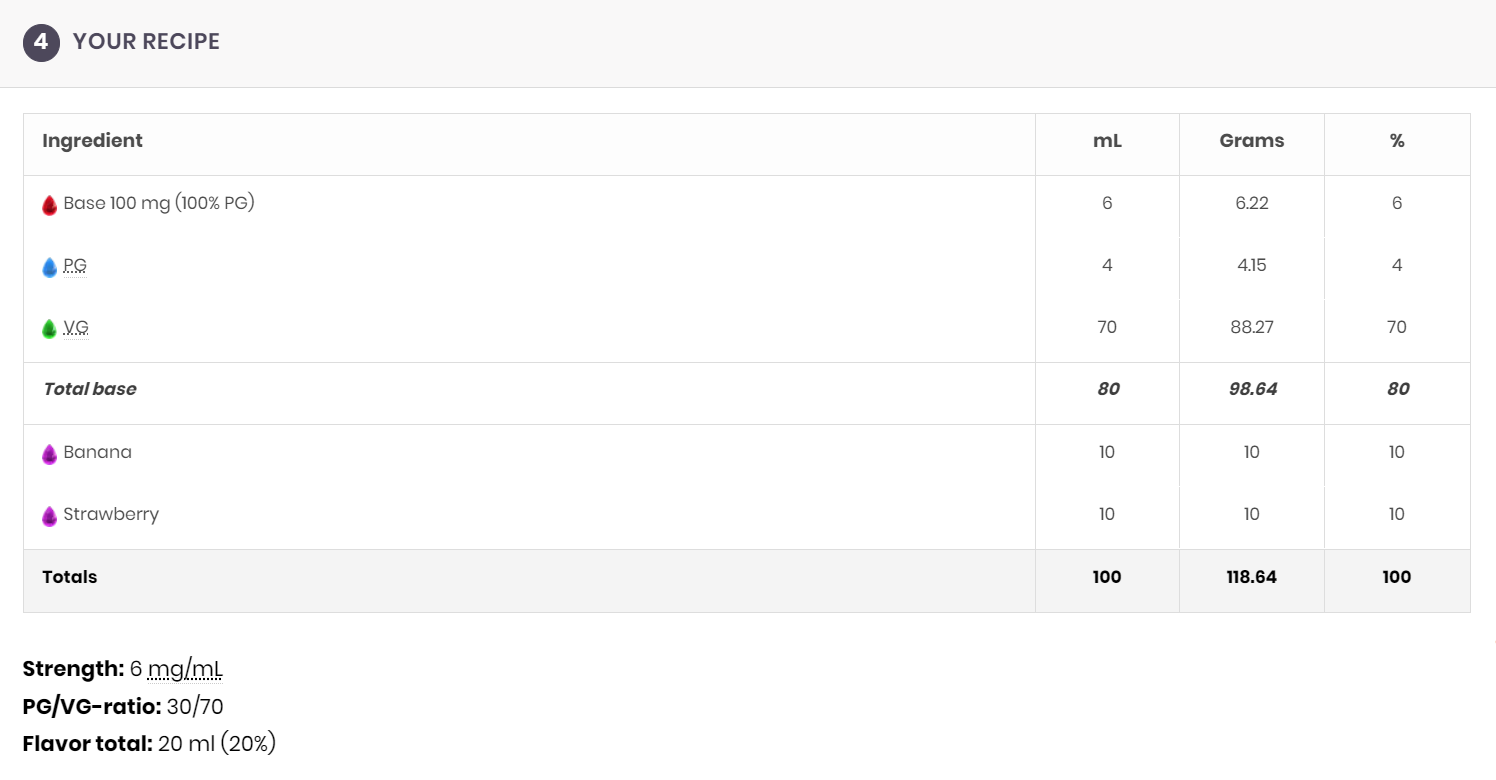
Use an e-liquid calculator to input your desired volume (100ml), nicotine strength (6mg), VG/PG ratio (70/30), and flavor percentages (10% banana, 10% strawberry). The calculator will provide the exact amounts of VG, PG, nicotine solution, and flavor concentrates needed:
Step 3. Adding Nicotine
Carefully measure and add 6ml of nicotine concentrate to your mixing bottle. Remember to use gloves and handle nicotine safely.
Step 4. Adding Base Liquids
Add 4 ml of PG to the bottle. Then, add 70ml of VG. The VG/PG ratio will affect both the throat hit and the amount of vapor produced.
Step 5. Incorporating Flavors
Measure and add 10ml each of banana and strawberry flavorings to the mix. These flavorings are typically PG-based and will contribute to the overall PG content.
Step 6. Sealing and Shaking
Once all ingredients are added, place the nipple on your bottle and screw the cap on tightly. To help the ingredients mix well, run your e-juice bottle under hot water for about 30 seconds or until the liquid thins out. Shake the bottle vigorously to ensure everything is thoroughly mixed.
Post-Mixing Steps
Labeling
Clearly label your vape juice with the creation date, the PG/VG ratio, nicotine strength (if applicable), and the flavor names. This is especially important if you're making multiple batches or experimenting with different recipes.
Steeping
Steeping allows the flavors to meld and mature, enhancing the overall taste of your vape juice. It's similar to aging wine. Steeping times can vary based on the flavor profile and personal preference – it could be a few days to several weeks. If you want to know more details, feel free to check this complete steeping guide.
Testing
After steeping, test the vape juice to see if the flavor has developed to your liking. Some flavors require longer steeping times, especially complex or dessert-type flavors.
Storing
Store your vape juice in a cool, dark place, away from direct sunlight or heat sources. Exposure to heat or light can degrade the quality and flavor of the e-liquid. For your and your family’s safety, Keep your stored vape juice out of reach of children and pets.
Troubleshooting Common Mixing Issues
DIY vape juice making is an enjoyable and rewarding hobby, but it's easy to make mistakes, especially for beginners. Here are some common mistakes and tips on how to avoid them:
1. Incorrect Measurements
Mistake: One of the most common mistakes is incorrect measurement of ingredients, leading to imbalanced flavors or incorrect nicotine levels.
Avoidance: Use precise measuring tools like syringes and graduated cylinders. Double-check your measurements, and consider using an e-juice calculator for accuracy.
2. Over-Flavoring
Mistake: Adding too much flavor concentrate can overwhelm the e-juice, making it too intense or disgusting.
Avoidance: Stick to recommended flavor percentages (usually between 10-20% of the total volume). Start with lower flavor concentrations and gradually increase if needed.
3. Not Steeping Properly
Mistake: Impatience can lead to vaping the e-juice immediately after mixing, not allowing the flavors to blend and mature properly.
Avoidance: Allow your vape juice to steep for the recommended time, usually a few days to weeks, depending on the flavor profile.
4. Using Low-Quality Ingredients
Mistake: Using cheap or low-quality ingredients can result in poor-tasting e-juice and may be harmful.
Avoidance: Always source high-quality PG, VG, flavors, and nicotine from reputable suppliers. Ensure flavorings are suitable for vaping.
5. Poor Nicotine Handling
Mistake: Mishandling nicotine can be dangerous, as it's a toxic substance, especially in higher concentrations.
Avoidance: Wear gloves when handling nicotine, and work in a well-ventilated area. Store nicotine safely and out of children's reach.
6. Inadequate Mixing
Mistake: Failing to mix ingredients thoroughly can result in an uneven distribution of flavors and nicotine.
Avoidance: Shake your e-juice vigorously after mixing and occasionally during steeping to ensure even distribution of all components.
7. Unsanitary Mixing Conditions
Mistake: Mixing in an unclean environment can introduce contaminants into the e-juice.
Avoidance: Always mix in a clean, clutter-free environment. Sanitize all equipment before use.
8. Lack of Experimentation Records
Mistake: Not keeping track of recipes and adjustments can make replicating or improving a mix difficult.
Avoidance: Keep a detailed record of your recipes, including the amounts and percentages of all ingredients and any tweaks made.
Useful Tips When DIY E-juice
Prioritize Safety: Wear gloves and eye protection when handling nicotine. Keep ingredients away from children and pets.
Start Simple: Begin with basic recipes and gradually experiment with more flavors.
Experiment and Adjust: Mix different flavors, but start with small amounts. Adjust the strength as needed.
Keep Records: Document your recipes for future reference and consistency.
Clean Workspace: Keep your mixing area clean and organized.
Community Engagement: Join online vaping communities for additional tips and feedback.
Bottom Line
Although DIY vape juice is a troublesome thing, it is also a rewarding and cost-effective way to personalize your vaping experience. Whether you're a beginner or an experienced vaper, you have the right to pursue your own e-liquid recipes and flavors. But always prioritize safety. Happy Vaping!